
'JAVA'에 해당되는 글 61건
- 2024.02.18 :: Bluetooth search
- 2023.12.22 :: java SimpleDateFormat
- 2023.10.15 :: +-> Fragment , getActivity()
- 2023.10.15 :: +-> ListView 사용하기 , RecyclerView
- 2023.10.15 :: +->Activity.runOnUiThread(Runnable)
- 2023.10.08 :: Java/BlueTooth LE device call sequence 1
-
- 아래 그림에서 검색버튼을 누르면 블루투스 장치 목록이 나타남
| 2024-02-17 22:17:54.950 23048-23048/com.example.bluetoothsearch D/BluetoothAdapter: startDiscovery 2024-02-17 22:17:54.953 23048-23048/com.example.bluetoothsearch D/MainActivity: mOnBluetoothSearch(): mBluetoothAdapter.startDiscovery() called 2024-02-17 22:17:55.397 23048-23048/com.example.bluetoothsearch D/MainActivity: ======> BluetoothDevice.ACTION_FOUND received 2024-02-17 22:17:55.399 23048-23048/com.example.bluetoothsearch D/MainActivity: ===> BluetoothDevice.ACTION_FOUND{address=68:51:06:F7:71:03, name=null} 2024-02-17 22:17:55.410 23048-23048/com.example.bluetoothsearch D/MainActivity: ======> BluetoothDevice.ACTION_FOUND received 2024-02-17 22:17:55.414 23048-23048/com.example.bluetoothsearch D/MainActivity: ===> BluetoothDevice.ACTION_FOUND{address=D0:B5:C2:95:12:7C, name=HC-05_EdiTech} 2024-02-17 22:17:55.486 23048-23048/com.example.bluetoothsearch D/MainActivity: ======> BluetoothDevice.ACTION_FOUND received 2024-02-17 22:17:55.489 23048-23048/com.example.bluetoothsearch D/MainActivity: ===> BluetoothDevice.ACTION_FOUND{address=CC:4F:5C:3E:6E:3A, name=MEDICAL PHANTOM} 2024-02-17 22:17:56.742 23048-23048/com.example.bluetoothsearch D/MainActivity: ======> BluetoothDevice.ACTION_FOUND received 2024-02-17 22:17:56.744 23048-23048/com.example.bluetoothsearch D/MainActivity: ===> BluetoothDevice.ACTION_FOUND{address=41:63:F7:19:E7:DD, name=null} 2024-02-17 22:18:05.562 23048-23048/com.example.bluetoothsearch D/MainActivity: ======> BluetoothDevice.ACTION_FOUND received 2024-02-17 22:18:05.577 23048-23048/com.example.bluetoothsearch D/MainActivity: ===> BluetoothDevice.ACTION_FOUND{address=88:0F:10:9A:4B:A7, name=MI_SCALE} 2024-02-17 22:18:07.841 23048-23048/com.example.bluetoothsearch D/MainActivity: ===> BluetoothAdapter.ACTION_DISCOVERY_FINISHED |

'JAVA > android_studio' 카테고리의 다른 글
| 안드로이드 벡터 패스(Vector Path) 그리기 (0) | 2024.03.14 |
|---|---|
| Listview의 글자 크기 변경 (0) | 2024.03.14 |
| +-> Fragment , getActivity() (0) | 2023.10.15 |
| +-> ListView 사용하기 , RecyclerView (0) | 2023.10.15 |
| +->Activity.runOnUiThread(Runnable) (0) | 2023.10.15 |
https://www.digitalocean.com/community/tutorials/java-simpledateformat-java-date-format
Java SimpleDateFormat - Java Date Format | DigitalOcean
www.digitalocean.com
For parsing time, we have to change the pattern while creating SimpleDateFormat instance.
String pattern = "HH:mm:ss.SSSZ";
SimpleDateFormat simpleDateFormat = new SimpleDateFormat(pattern);
String date = simpleDateFormat.format(new Date());
System.out.println(date);
This code will output “HH:mm:ss.SSSZ”:
13:03:15.454+0530
This pattern produces “hours”, “minutes”, “seconds”, “milliseconds”, and “timezone offset in hours (RFC pattern)”.
This code displayed the time as “13:03:15.454+0530
import java.util.Date; // .Date; import java.text.SimpleDateFormat; public class TestDateFormat { public static void main(String[] args) { for(int j=0; j < 10 ; j++ ) { String pattern = "yyyy-MM-dd/HH:mm:ss.SSS Z"; SimpleDateFormat simpleDateFormat = new SimpleDateFormat(pattern); String date = simpleDateFormat.format(new Date() ) ; // java.util.Date() ) ; // Date()); System.out.println("j=" + j + ", " + date); } } } -- OUTPUT: j=0, 2023-12-26/14:14:46.429 +0900 j=1, 2023-12-26/14:14:46.430 +0900 j=2, 2023-12-26/14:14:46.430 +0900 j=3, 2023-12-26/14:14:46.430 +0900 j=4, 2023-12-26/14:14:46.431 +0900 j=5, 2023-12-26/14:14:46.431 +0900 j=6, 2023-12-26/14:14:46.431 +0900 j=7, 2023-12-26/14:14:46.431 +0900 j=8, 2023-12-26/14:14:46.431 +0900 j=9, 2023-12-26/14:14:46.432 +0900 |
'JAVA' 카테고리의 다른 글
| Kotlin app call flow (0) | 2025.06.30 |
|---|---|
| Java/BlueTooth LE device call sequence (1) | 2023.10.08 |
| Web Serial port (0) | 2023.09.13 |
| Java, Digit check from string (0) | 2022.12.06 |
| java 커맨드라인 실행시 한글깨질때 방지법 (0) | 2022.10.24 |
-
https://yongyi1587.tistory.com/10
[Android] Fragment에서 Activity Method 사용하기
Fragment에서 Activity의 method를 사용하는 법입니다.간단한 예제로 설명하겠습니다. MainActivity.javapublic class MainActivity extends AppCompatActivity {...private Button btn;...public void testMethod() {Log.d("MainActivity", "Test M
yongyi1587.tistory.com
'JAVA > android_studio' 카테고리의 다른 글
| Listview의 글자 크기 변경 (0) | 2024.03.14 |
|---|---|
| Bluetooth search (0) | 2024.02.18 |
| +-> ListView 사용하기 , RecyclerView (0) | 2023.10.15 |
| +->Activity.runOnUiThread(Runnable) (0) | 2023.10.15 |
| 바인드 서비스 Bound Service (0) | 2022.10.12 |
-
https://velog.io/@krrong/Android-ListView-%EC%82%AC%EC%9A%A9%ED%95%98%EA%B8%B0
[Android] ListView 사용하기
ListView 사용하기
velog.io
https://kadosholy.tistory.com/53
[안드로이드] RecyclerView 사용법 (리사이클러뷰)
RecyclerView 사용법 (리사이클러뷰) RecyclerView는 대량의 데이터를 효율적으로 화면에 나타내기 위해서, 각 아이템을 목록형태로 화면에 나타내는데 사용됩니다. ListView와 유사하나 아래와 같은 성
kadosholy.tistory.com
'JAVA > android_studio' 카테고리의 다른 글
| Bluetooth search (0) | 2024.02.18 |
|---|---|
| +-> Fragment , getActivity() (0) | 2023.10.15 |
| +->Activity.runOnUiThread(Runnable) (0) | 2023.10.15 |
| 바인드 서비스 Bound Service (0) | 2022.10.12 |
| [안드로이드] 예제로 알아보는 바인드된 서비스 (Bound Service) (0) | 2022.10.11 |
-
https://codetravel.tistory.com/12
runOnUiThread 사용하기
앞서 안드로이드 "안드로이드 메인 스레드 포스팅"을 통하여 메인스레드의 특징에 대해서 알아보았습니다. 그 중에서 메인 스레드가 아닌 스레드에서 Button UI를 조작하다가 CalledFromWrongThreadExcept
codetravel.tistory.com
- http://www.gisdeveloper.co.kr/?p=2048
[Android] 맨날 까먹는 runOnUiThread 사용예 – GIS Developer
통신을 통해 데이터를 스레드를 통해 딱… 가져오고 난 후 동일한 스레드에서 바로 Spinner 등과 같은 UI에 데이터를 설정하시면 우에엑~~ 하고 구토를 하시는 안드로이드님. UI 단에 데이터를 설정
www.gisdeveloper.co.kr
'JAVA > android_studio' 카테고리의 다른 글
| +-> Fragment , getActivity() (0) | 2023.10.15 |
|---|---|
| +-> ListView 사용하기 , RecyclerView (0) | 2023.10.15 |
| 바인드 서비스 Bound Service (0) | 2022.10.12 |
| [안드로이드] 예제로 알아보는 바인드된 서비스 (Bound Service) (0) | 2022.10.11 |
| 안드로이드 바인드 서비스 예제 (1) | 2022.10.11 |
opensource: simple_bluetooth_le_terminal
| 0) 최초 실행시 MainActivity에서 fragment에 DeviceFragment()를 추가해준다. > MainActivity.java onCreate() 에서 DeviceFragment.java DeviceFragment() 를 호출함 DeviceFragment.java +-> OnCreate() => ... +-> onOptionsItemSelected() +->startScan() ..+->new Thread(() -> bluetoothAdapter.startLeScan(null, leScanCallback), "startLeScan") 1) scan 버튼 누르고 BLE device list에서 1개 선택할때 DeviceFragment.java / onListItemClick() +-> new TerminalFragment() 로 이동함 .simple_bluetooth_le_terminal D/ViewRootImpl@6a45722[MainActivity]: ViewPostIme pointer 0 .simple_bluetooth_le_terminal D/ViewRootImpl@6a45722[MainActivity]: ViewPostIme pointer 1 l D/BluetoothAdapter: startLeScan(): null l D/BluetoothAdapter: STATE_ON l I/chatty: uid=10580(de.kai_morich.simple_bluetooth_le_terminal) startLeScan identical 1 line l D/BluetoothAdapter: STATE_ON l D/BluetoothLeScanner: Start Scan with callback D/BluetoothLeScanner: onScannerRegistered() - status=0 scannerId=12 mScannerId=0 I/oth_le_termina: Compiler allocated 4MB to compile void android.widget.TextView.<init>(android.content.Context, android.util.AttributeSet, int, int) D/BluetoothAdapter: stopLeScan() D/BluetoothAdapter: STATE_ON D/BluetoothAdapter: STATE_ON D/BluetoothLeScanner: Stop Scan with callback D/ViewRootImpl@6a45722[MainActivity]: ViewPostIme pointer 0 D/ViewRootImpl@6a45722[MainActivity]: ViewPostIme pointer 1 D/AbsListView: onTouchUp() mTouchMode : 0 D/SerialSocket: connect D0:B5:C2:95:12:7C D/SerialSocket: connectGatt,LE D/BluetoothAdapter: STATE_ON D/BluetoothGatt: connect() - device: D0:B5:C2:95:12:7C, auto: false D/BluetoothAdapter: isSecureModeEnabled D/BluetoothGatt: registerApp() D/BluetoothGatt: registerApp() - UUID=ec5de07c-7488-4183-b214-eaa25e98e8f2 D/BluetoothGatt: onClientRegistered() - status=0 clientIf=12 D/BluetoothGatt: onClientConnectionState() - status=0 clientIf=12 device=D0:B5:C2:95:12:7C D/SerialSocket: connect status 0, discoverServices D/BluetoothGatt: discoverServices() - device: D0:B5:C2:95:12:7C D/BluetoothGatt: onConnectionUpdated() - Device=D0:B5:C2:95:12:7C interval=6 latency=0 timeout=500 status=0 D/BluetoothGatt: onSearchComplete() = Device=D0:B5:C2:95:12:7C Status=0 D/SerialSocket: servicesDiscovered, status 0 D/SerialSocket: service cc254x uart D/SerialSocket: request max MTU D/BluetoothGatt: configureMTU() - device: D0:B5:C2:95:12:7C mtu: 512 D/BluetoothGatt: onConnectionUpdated() - Device=D0:B5:C2:95:12:7C interval=39 latency=0 timeout=500 status=0 D/BluetoothGatt: onConfigureMTU() - Device=D0:B5:C2:95:12:7C mtu=23 status=0 D/SerialSocket: mtu size 23, status=0 D/SerialSocket: payload size 20 D/BluetoothGatt: setCharacteristicNotification() - uuid: 0000ffe1-0000-1000-8000-00805f9b34fb enable: true D/SerialSocket: enable read notification D/SerialSocket: writing read characteristic descriptor D/SerialSocket: writing read characteristic descriptor finished, status=0 D/SerialSocket: connected D/SerialSocket: read, len=3,data:AT D/SerialSocket: read, len=17,data:0MyConnected,000 D/BluetoothGatt: onConnectionUpdated() - Device=D0:B5:C2:95:12:7C interval=9 latency=0 timeout=100 status=0 D/SerialSocket: read, len=17,data:0MyConnected,000 D/SerialSocket: read, len=11,data:21,1,1,1,0 D/SerialSocket: read, len=11,data:21,1,1,1,0 D/SerialSocket: read, len=11,data:21,1,1,1,0 |
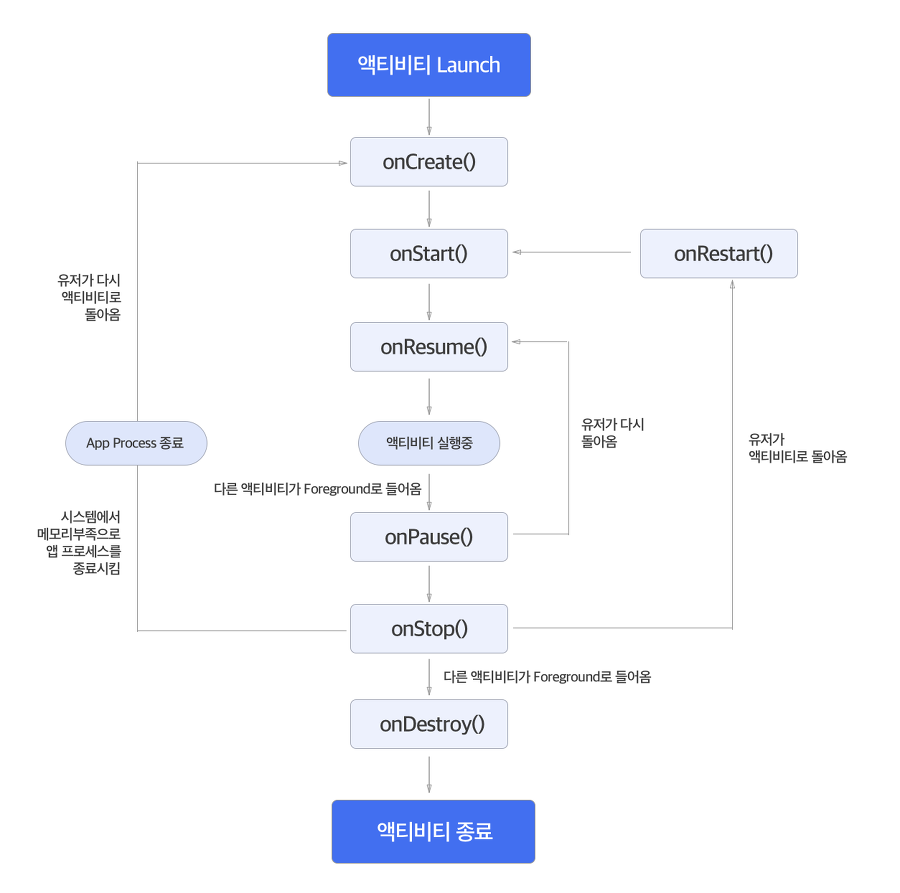
*참고: Activity vs Fragment life cycle
https://developer88.tistory.com/69
Activity 와 Fragment 의 lifecycle (생명주기)
안드로이드는 에서 Activity와 Fragment의 lifecycle(생명주기)에 맞추어 개발을 하는 것이 매우 중요한데요. 오늘은 Activity와 Fragment의 생명주기에 관해서 정리해보겠습니다. 1. Activity 생명주기 먼저, Ac
developer88.tistory.com
 |
 |
'JAVA' 카테고리의 다른 글
| Kotlin app call flow (0) | 2025.06.30 |
|---|---|
| java SimpleDateFormat (0) | 2023.12.22 |
| Web Serial port (0) | 2023.09.13 |
| Java, Digit check from string (0) | 2022.12.06 |
| java 커맨드라인 실행시 한글깨질때 방지법 (0) | 2022.10.24 |